This guide provides AudioReach Architecture overview on Raspberry Pi platform and walks through steps on how to create a Yocto image that integrates AudioReach,
load that image on a Raspberry Pi4 device, and then run an AudioReach usecase.
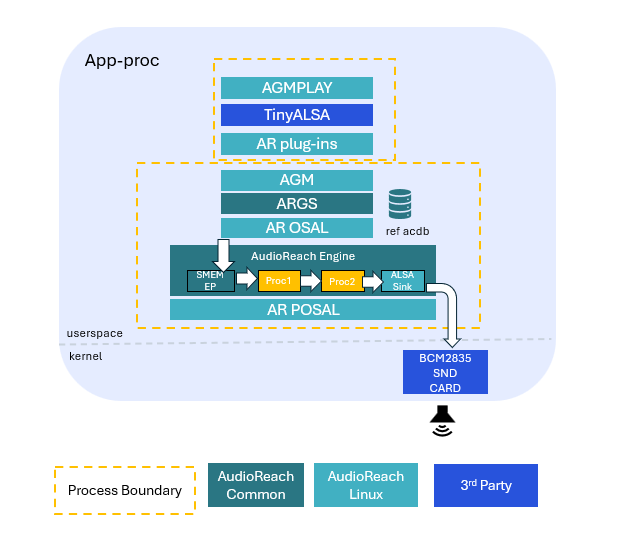
The above architecture diagram illustrates the playback use-case on a Raspberry
Pi using AudioReach. In this setup, the agmplay test app is utilized to play an
audio clip, and the sound output is rendered through an output device such as
speakers or headphones.
Here, when a graph open request is received by AudioReach Graph Services (ARGS)
from the client, ARGS retrieves the audio graph and calibration data using the
use case handle and calibration handle from Audio Calibration Data Base (ACDB).
It then provides the graph definition and corresponding calibration data to
the AudioReach Engine (ARE) via the Generic Packet Router (GPR) protocol over
a physical or soft data link.
Upon receiving the data, ARE forms an audio graph with processing modules
according to the graph definition. It processes the audio data piped from the
source endpoint to the ALSA Sink endpoint, which is then rendered through a
BCM2835 sound card. Although ARE allows developers to design their use case
graphs and support distributed processing across heterogenous cores, given
that Raspberry Pi lacks DSP, ARE runs on the APPS processor in user space.
Additionally, during the playback use-case, the graph topology can be
visualized in real-time using a PC-based GUI tool called AudioReach
Creator (ARC, also known as QACT).
The first step is to integrate AudioReach components
into a Yocto build that can be loaded onto the Raspberry Pi device. This involves syncing a Yocto build and then integrating the meta-audioreach layer, which is currently available as a Github repository.
Go back to the root Yocto directory and run the below command to setup the build environment (this will automatically create some necessary configuration files, as well as a “build” directory):
source./sources/poky/oe-init-build-env
Navigate to the file “<yocto_build_root>/build/conf/local.conf” and add the below line:
MACHINE?="raspberrypi4"
Navigate to the “build/conf/bblayers.conf” file and add the necessary meta layers by editing the file as shown:
# POKY_BBLAYERS_CONF_VERSION is increased each time build/conf/bblayers.con# changes incompatiblyPOKY_BBLAYERS_CONF_VERSION="2"BBPATH="${TOPDIR}"
BBFILES?=""
BBLAYERS?=" \ <path_to_build>/sources/poky/meta \ <path_to_build>/sources/poky/meta-poky \ <path_to_build>/sources/poky/meta-yocto-bsp \ <path_to_build>/sources/meta-raspberrypi \ <path_to_build>/sources/meta-openembedded/meta-oe \ <path_to_build>/sources/meta-openembedded/meta-multimedia \ <path_to_build>/sources/meta-openembedded/meta-networking \ <path_to_build>/sources/meta-openembedded/meta-python \ "
Now navigate to the file “<yocto_build_root>/build/conf/bblayers.conf”, and under the BBLAYERS ?= ” \ section, append the below line to integrate the AudioReach meta layer:
To ensure the AudioReach system image is compiled as a part of the full Yocto build, navigate to the file “<yocto_build_root>/build/conf/local.conf” and append the below line:
Raspberry Pi devices do not have a DSP, so instead support for ARE (AudioReach engine) on the APPS processor must be enabled. To do this, add these additional lines to the “local.conf” file:
Now the build setup is complete, and the full Yocto image can be generated. Navigate to the “build” directory
and run the below command to generate the image:
bitbakecore-image-sato
If the bitbake command gives a “umask” error, run the command umask 022 and try again.
If there is a “restricted license” error, navigate to the “<yocto_build_root>/build/conf/local.conf” file and append the below line:
LICENSE_FLAGS_ACCEPTED="synaptics-killswitch"
Once the compilation is successful, the Yocto image will be generated. Navigate to the folder “<yocto_build_root>/build/tmp/deploy/images/raspberrypi4” and locate the zip file “core-image-sato-raspberrypi4.rootfs.wic.bz2”. This contains the “.wic” image that can
be flashed onto the Raspberry Pi device. Unzip the “.bz2” file to obtain the image.
The generated Yocto image can be flashed to an SD card using Raspberry Pi Imager. This can be installed from raspberrypi.com/software, or by running sudo apt install rpi-imager on a Linux terminal. Then follow the below steps to flash the device:
Open Raspberry Pi Imager, and if there is a “Choose Device” option, select “RaspberryPi4” as the device type.
Under the “Choose OS” option, select “Use custom”. Make sure to search for all file types. Then navigate to the “.wic” file and select it.
Under “Storage”, select the desired SD card.
Click “Flash” to start flashing the image.
Once the flashing is complete, the SD card will contain the Yocto image.
Next, please complete the following steps to enable the audio and update
the logging settings. The files mentioned below can be updated directly on the Raspberry Pi 4 UI if the device is plugged into an external monitor, or through a local computer using SCP.
Note: Users can also connect to the Raspberry Pi through SSH by opening a connection to “root@<Raspberry PI IP address>”. By default, there is no password required to connect to SSH.
To enable the sound card:
Navigate to the file “/boot/config.txt”
Locate the line #dtparam=audio=off
Change this line to dtparam=audio=on
Make sure to uncomment this line while updating.
Optional step: In the file /boot/config.txt, it is also possible to disable HDMI audio output if the Raspberry Pi will be
connected to a display. This is helpful because if the HDMI sound card is enumerated, it may change the sound card ID of the
Headphones device, which would require the card ID to be updated in ARC.
Navigate to the file “/boot/config.txt”
Locate the line dtoverlay=vc4-kms-v3d
Change this line to dtoverlay=vc4-kms-v3d,noaudio
By default, the system logs printed while running a Raspberry Pi usecase will be short. The system log settings should be updated to capture the additional usecase logs that will be printed by AudioReach:
Navigate to the file “/etc/syslog-startup.conf”
Uncomment the lines Rotate size (ROTATESIZE) and Rotate Generations (ROTATEGENS)
Set ROTATESIZE to 1000000.
This rotate size field indicates the maximum log file size before a new log file will be generated.
Set ROTATEGENS to 20.
This indicates the maximum number of log files that can be generated.
Save the file.
To apply the updated configuration settings, shut down the Raspberry Pi through
the homescreen, or by running the below command in the terminal:
ARC (AudioReach Creator) is a tool that allows the user to perform several functionalities related to the audio usecase, including creating and editing audio usecase graphs, and editing audio configurations while running an
audio usecase in real time. For more information on ARC, please refer to the AudioReach Creator page.
Please note that at this time, AudioReach Creator is only available on Windows.
The below steps will demonstrate how to connect ARC to the Raspberry Pi so that the usecase graph can be viewed in real time.
On the Raspberry Pi:
Connect the Raspberry Pi to internet using Ethernet or over Wifi.
Ethernet
Plug an Ethernet cable into the Raspberry Pi’s Ethernet port.
Wifi
On the top right of the screen click the icon beside the time, and select “Preferences”.
Find the “Wireless Network” option on the left to choose the network.
Open a terminal and run the command ifconfig to find the current IP address.
On the terminal, run the command ats_gateway <IP address> 5558
Open another terminal, and run the command agm_server
On a local computer:
Install ARC (also known as QACT) on a Windows host machine using Steps to install ARC. You will need at least QACT 8.1
Open ARC, and click on the “Connection configuration” option.
Add the Raspberry Pi as a device by adding the entry <Raspberry PI IP address>:5558 under the TCP/IP section
Refresh the “Available Devices” list. The IP address of the Raspberry Pi should appear on the list.
If it does not appear, please ensure the ats_gateway and agm_server commands are still running.
Now the “.wav” file should play through the external audio device. If the Raspberry Pi is connected to ARC, the current usecase graph will appear in the graph view.
The system logs for the usecase will be saved in the file “/var/log/messages”.
ALSA lib provides an alternative interface for audio playback and capture on the Raspberry Pi.
The ALSA lib packages included in the Yocto build provide additional audio utilities and tools
that can be used alongside AudioReach.
For detailed information on ALSA lib integration with AudioReach, including metadata generation,
configuration, and advanced use-cases, please refer to ALSA lib using AudioReach.
The arguments agm:100,100 correspond to CARD=100 and DEV=100 as defined in the AGM virtual sound card configuration. Card ID 100 identifies the AGM virtual sound card (virtualsndcard), and device ID 100 refers to PCM100, the playback PCM device defined under that card. For capture, device ID 101 (PCM101) would be used instead. These IDs are not fixed by the plugin itself — they are defined in the virtual sound card definition file and must match accordingly.
On the Raspberry Pi terminal, run the below command:
cat/proc/asound/cards
This should output the available sound cards. If the output instead says “no sound cards available”, you likely
forgot to enable the sound cards (see section Configure bootup settings).
If the Raspberry Pi is connected to the monitor, the HDMI-based soundcard might get enumerated in the file “/proc/asound/cards”, causing the
card ID of the Headphones to change. To fix this, you will need to have ARC installed on a secondary computer (see section Enable Real-time Calibration Mode).
Copy the ACDB and workspace files from the Raspberry Pi to your local computer. These files
can be found under the folder “/etc/acdbdata”.
Note: This can be done by using “scp” commands on a Linux terminal or by using a program such as “WinScp”.
Open ARC in offline mode by selecting the “Open ACDB File on Disk” option.
This will prompt you to select a workspace file. Select the workspace file
copied from the Raspberry Pi.
On the top left drop down menu displaying the usecases,
select any usecase that uses “Speaker”.
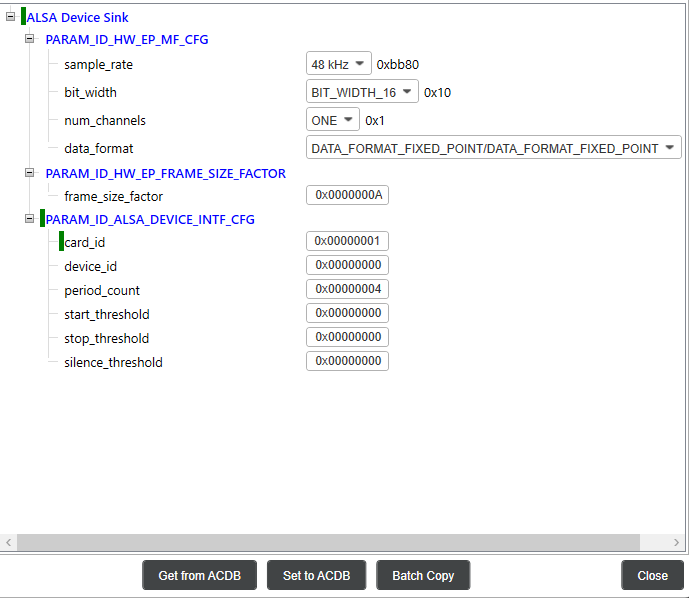
Double click the “ALSA Device Sink” module shown below
This will open the Configure Window. Check the “card_id” field here. The card_id should
be the same as the ID that corresponds with the Headphones entry in the
“/proc/asound/cards” file on the Raspberry Pi.
If it is not the same, update the value, and click “Set to ACDB” on the
bottom for the changes to take effect.
On the ARC menu, click “Save” on the top left to update the ACDB files.
Copy the updated ACDB files back to the Raspberry Pi (it is recommended to first delete the files that are currently in the “/etc/acdbdata” folder to ensure the changes take effect)
Shutdown the system so the changes can take effect. Then, try running the usecase again.