RB3 Gen2
This guide provides AudioReach Architecture overview on RB3 (Robotics) platform and walks through steps on how to create a Yocto image that integrates AudioReach, load that image on a RB3 Gen2 device, and then run an AudioReach usecase.
Architecture Overview
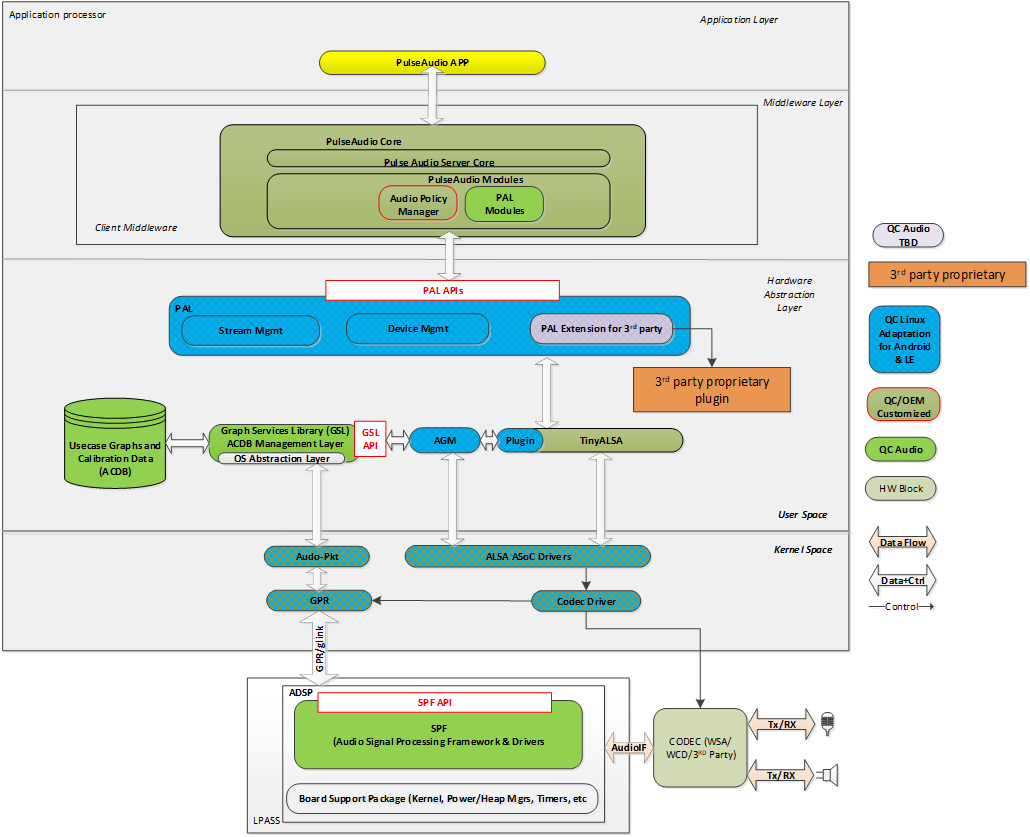
The above architecture diagram illustrates the playback/record use-case on a RB3 Gen2 using AudioReach. In this setup, PulseAudio test applications are utilized to play/record an audio clip, and the sound is rendered/captured through devices like microphone and speaker. For more details refer here.
Note
AudioReach is currently transitioning from PulseAudio to PipeWire as the primary audio server. This documentation will be updated as the migration progresses.
Create a Yocto image
The first step is to integrate AudioReach components into a Yocto build that can be loaded onto the RB3 device. This involves syncing a Yocto build and then integrating the meta-audioreach layer, which is currently available as a Github repository.
Before following these steps, it would be helpful to learn the basics of how to use a Yocto project. To do this, please refer to the official Yocto documentation site.
There are two options for building a Yocto image that incorporates AudioReach components. One option is to use the Qualcomm Linux builds and the other option is using meta layers directly.
Using Qualcomm Linux builds (Released CRM builds)
For instructions on setting up a Yocto build with AudioReach components, refer build guide.
The build setup process varies based on your Qualcomm access level. For comprehensive details about different access levels, visit the Working with Qualcomm page. Important Note: While unregistered users can access basic images for flashing, meaningful AudioReach development requires at least a registered user access level. Registered users gain access to essential development tools like AudioReach Creator (ARC). We strongly recommend registering with Qualcomm to unlock the full AudioReach development experience.
Note:
RB3 Platform is based QCS6490 chipset and supported machine names are qcs6490-rb3gen2-core-kit and qcs6490-rb3gen2-vision-kit.
To access the ADSP firmware source code, you must be registered as an Authorized user with Qualcomm.
Qualcomm Linux supports different versions for Application Development. The Software Architecture Guide provides detailed information about these versions:
The Base version is an upstream, open-source software stack without Qualcomm proprietary software.
The Custom version includes downstream Qualcomm proprietary software with extra SDKs and improved power performance. For AudioReach-based solutions, you should use the Custom variant.
Directly pulling using meta layers (AudioReach latest source code)
The current Qualcomm Linux builds for RB3 utilize components from the Code Linaro codebase. We are actively working to enable direct integration from upstream GitHub repositories, which will allow developers to access the latest AudioReach source code directly.
Flash the Yocto image
To flash the Yocto image onto your RB3 Gen2 device, follow the instructions provided in the Flashing Guide.
Setting up the RB3 Gen2
Setup the RB3 hardware using Qualcomm Linux documentation
Follow below sections to setup the device for this guide:
Power up the device
Set up debug UART
Verify the Qualcomm Linux version
Connect to a network
Set up Audio hardware
Activate the digital microphone interface (DMIC) on the board, by following steps in section “Set up audio hardware” from here
Check for Sound Card
Check if Sound card is enumerated:
cat /proc/asound/cards
Check for PulseAudio Service
Check if PulseAudio service is running
systemctl status pulseaudio
Enable Real-time Calibration Mode
ARC (AudioReach Creator) is a tool that allows the user to perform several functionalities related to the audio usecase, including creating and editing audio usecase graphs, and editing audio configurations while running an audio usecase in real time. For more information on ARC, please refer to the AudioReach Creator page.
NOTE: ARC is currently supported only on Windows host machine.
The below steps will demonstrate how to connect ARC to the RB3 so that the usecase graph can be viewed in real time.
Connect a type C cable to RB3 at one end and the USB cable to Windows host machine.
Install ARC (also known as QACT) on a Windows host machine using Steps to install ARC. You will need at least QACT 8.1
Open ARC, Click on “Connect to Device”.
Running an AudioReach Usecase
Once all of the above setup is complete, we are ready to run Audio use-case on RB3. The below section list steps to run playback and record use-case using PulseAudio. Check out Enable Audio use-cases using PulseAudio to know more.
Playback
Push a “.wav” file onto some location in the RB3, such as the “/etc” folder.
Find the IP Address of RB3 device by connecting the serial shell using UART console.
Use scp (Secure Copy Protocol) to copy a wav file from host machine to the RB3 device.
scp <wave file path> root@<RB3 IP Address>:/etc/
Connect an external audio device (such as speakers or headphones) to the audio port of the RB3 if not already connected.
Open serial shell terminal window on host machine and run below command to start the playback usecase:
paplay <Path to .wav file> -d low-latency0
Now the “.wav” file should play through the external audio device. If the RB3 is connected to ARC, the current usecase graph will appear in the graph view. The system logs for the usecase will be saved in the file “/var/log/messages”.
Record
Open serial shell terminal window on host machine and run below command to start the record usecase:
parec --rate=48000 --format=s16le --channels=1 --file-format=wav <Path to store .wav file> -d regular0
Above command stores the recorded .wav file at specified path.
Next Steps
Exploring AudioReach Components in the QCLINUX Build
Recipes for AudioReach components are available at Path: <WORKSPACE_ROOT>/workspace/layers/meta-qcom-hwe/recipes-multimedia/audio/.
To modify existing code follow below steps:
Check for the recipe name from above path.
Use devtool to get fetch source as below:
cd <WORKSPACE_ROOT>/workspace/<build_dir>
# example build_dir build-qcom-wayland

devtool modify <recipe-name>

#Example for qcom-agm_git.bb recipe
devtool modify qcom-agm
This extracts the source code at path <BUILD_ROOT>/workspace/build-qcom-wayland/workspace/source/qcom-agm/ directory.
Note: The following table maps Qualcomm Linux project names to AudioReach GitHub repository names:
Downstream Name
Upstream Project Name
qcom-agm
audioreach-graphmgr
qcom-pal
audioreach-pal
qcom-acdbdata
audioreach-conf
qcom-args
audioreach-graphservices
pulseaudio-plugin
audioreach-pulseaudio-plugin
Adding a new Module to ADSP Image
ADSP source code is available only for Authorized users.
If you have Authorized access, refer to Adding a Custom Module in SPF guide to integrate a new module into ADSP Image.
Alternatively, you can use the Hexagon SDK to compile a standalone .so file for your custom module on the ADSP. The Hexagon SDK can be downloaded from the Qualcomm Developer Network.
Troubleshooting
Checkout Audio Troubleshooting guide for Audio logging and debugging.